
Redisson
Redisson是一个在Redis的基础上实现的Java驻内存数据网格(In-Memory Data Grid)。它不仅提供了一系列的分布式的Java常用对象,还实现了可重入锁(Reentrant Lock)、公平锁(Fair Lock、联锁(MultiLock)、 红锁(RedLock)、 读写锁(ReadWriteLock)等,还提供了许多分布式服务。Redisson提供了使用Redis的最简单和最便捷的方法。Redisson的宗旨是促进使用者对Redis的关注分离(Separation of Concern),从而让使用者能够将精力更集中地放在处理业务逻辑上。
Redisson 原理解读
加锁原理-可重入机制
之前在使用 sexnx 实现分布式锁时,需要考虑加锁和解锁时的操作原子性。在实现删除锁时,采用了 lua 脚本来解锁。因为 lua 脚本操作 redis 命令的时候,具有着一些优势。
lua 脚本的优点:
- 原子操作:将脚本作为一个整体执行,执行过程不会插入其它命令,无需使用事务。
- 减少网络开销:将多个 redis 请求一次发送。
在 Redisson 中,加锁其实就是通过 lua 脚本实现的。
源码中的体现
    <T> RFuture<T> tryLockInnerAsync(long leaseTime, TimeUnit unit, long threadId, RedisStrictCommand<T> command) {
        internalLockLeaseTime = unit.toMillis(leaseTime);

        return commandExecutor.evalWriteAsync(getName(), LongCodec.INSTANCE, command,
                  "if (redis.call('exists', KEYS[1]) == 0) then " +
                      "redis.call('hset', KEYS[1], ARGV[2], 1); " +
                      "redis.call('pexpire', KEYS[1], ARGV[1]); " +
                      "return nil; " +
                  "end; " +
                  "if (redis.call('hexists', KEYS[1], ARGV[2]) == 1) then " +
                      "redis.call('hincrby', KEYS[1], ARGV[2], 1); " +
                      "redis.call('pexpire', KEYS[1], ARGV[1]); " +
                      "return nil; " +
                  "end; " +
                  "return redis.call('pttl', KEYS[1]);",
                    Collections.<Object>singletonList(getName()), internalLockLeaseTime, getLockName(threadId));
}把其中 lua 脚本命令摘选出来。
if (redis.call('exists', KEYS[1]) == 0)
  then redis.call('hset', KEYS[1], ARGV[2], 1);
			 redis.call('pexpire', KEYS[1], ARGV[1]);
	return nil;
	end;
if (redis.call('hexists', KEYS[1], ARGV[2]) == 1)
  then redis.call('hincrby', KEYS[1], ARGV[2], 1);
       redis.call('pexpire', KEYS[1], ARGV[1]);
  return nil;
  end;
return redis.call('pttl', KEYS[1]);"其中各个参数对应关系如下:
- KEYS[1]:分布式锁 key。
- ARGV[2]:加锁客户端 ID。
- ARGV[1]:锁 key 的默认失效时间,默认 30 秒。
锁在 redis 中的数据格式是 hash 类型,类似下方命令。
127.0.0.1:6379> hset mylock 285475da-9152-4c83-822a-67ee2f116a79:52 1
(integer) 1针对 lua 脚本过程解析,有三种情况。
- 分布式锁 key 不存在。
- 分布式锁 key 已存在,相同客户端非首次设置。
- 分布式锁 key 已存在,不同客户端设置。
//1.分布式锁key首次设置
//1.1 判断分布式锁 key 是否存在 => 不存在
if (redis.call('exists', KEYS[1]) == 0)
  //1.2 设置分布式锁key(设置客户端Id,设置计数统计(方便重入次数))
  then redis.call('hset', KEYS[1], ARGV[2], 1);
			 //1.3 为分布式锁key增加默认失效时间
			 redis.call('pexpire', KEYS[1], ARGV[1]);
	return nil;
	end;
//2.同一个key已经设置过
//2.1 hexists (分布式锁为hash结构) 判断分布式锁key和相同客户端Id是否已经存在 => 存在
if (redis.call('hexists', KEYS[1], ARGV[2]) == 1)
  //2.2 增加计数统计
  then redis.call('hincrby', KEYS[1], ARGV[2], 1);
			 //	增加失效时间
       redis.call('pexpire', KEYS[1], ARGV[1]);
  return nil;
  end;
//3.不满足加锁条件,返回当前锁剩余时间
return redis.call('pttl', KEYS[1]);"从 lua 脚本中发现,Redisson 支持同一客户端多次加同一把锁,对应的有一个计数器的变化,体现了 Redisson 的可重入性。
锁申请机制
当锁正在被使用的时候,其它线程申请锁时,利用了 Redis 的发布订阅机制,再通过 CountDownLatch 工具进行阻塞,在锁释放或等待超时时进行对应处理。这样有效的解决了无效的锁申请浪费资源的问题。
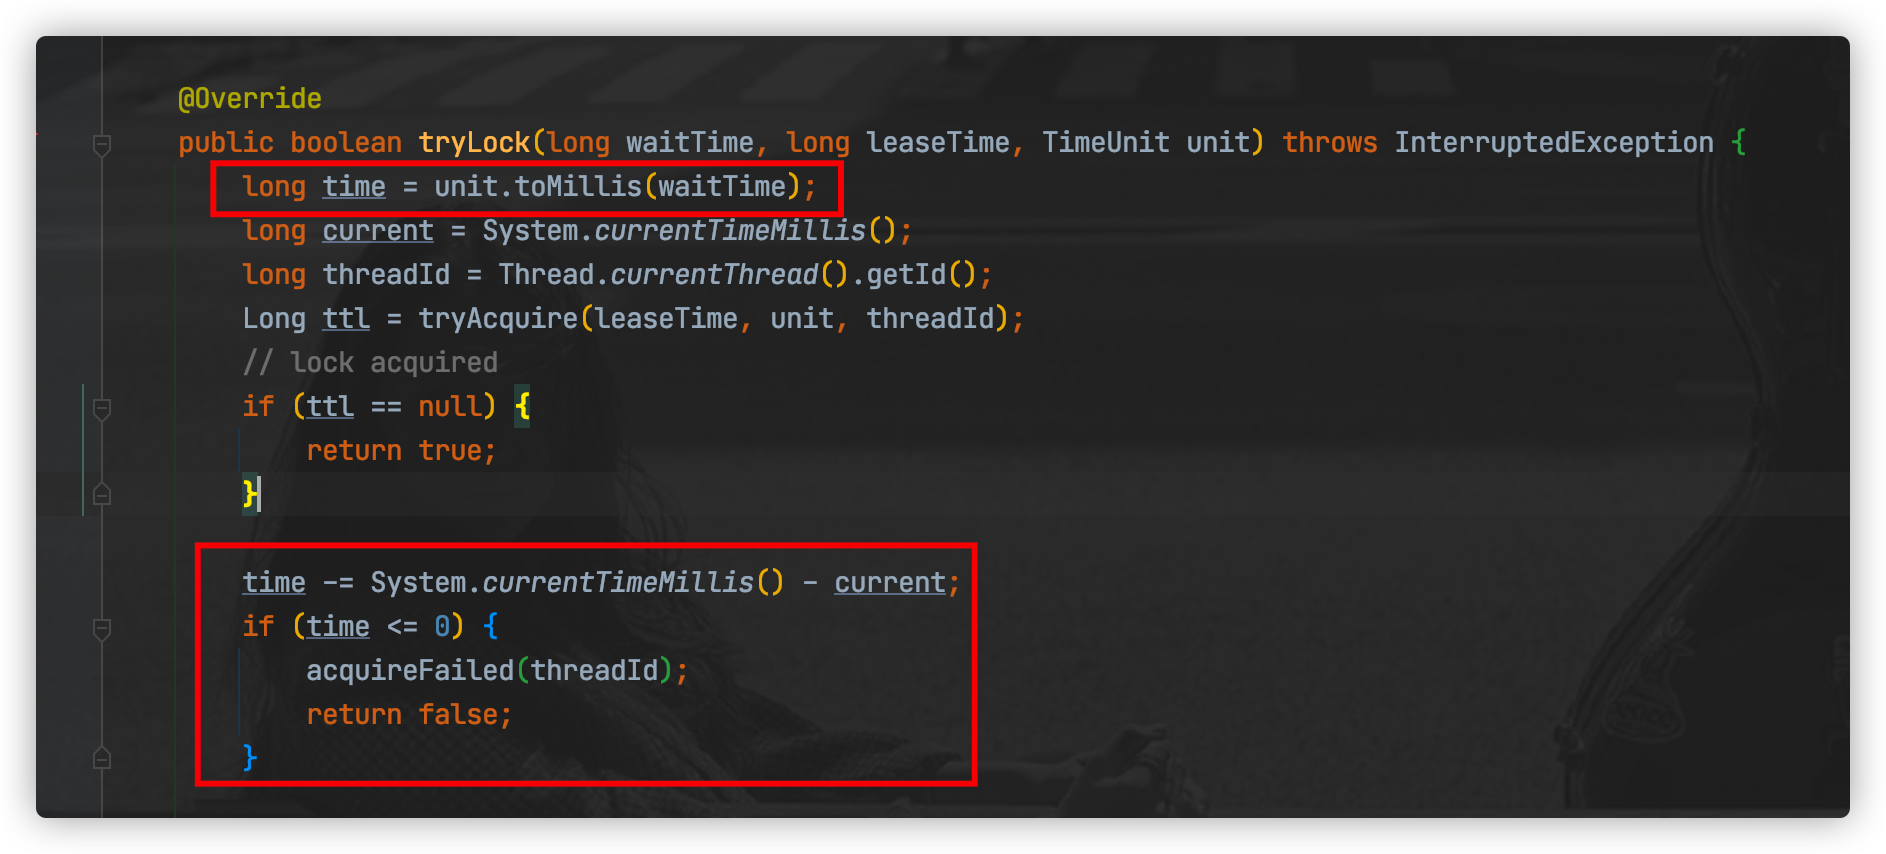
public boolean tryLock(long waitTime, long leaseTime, TimeUnit unit) throws InterruptedException {
long time = unit.toMillis(waitTime);
long current = System.currentTimeMillis();
long threadId = Thread.currentThread().getId();
Long ttl = this.tryAcquire(leaseTime, unit, threadId);
if (ttl == null) {
return true;
} else {
time -= System.currentTimeMillis() - current;
if (time <= 0L) {
this.acquireFailed(threadId);
return false;
} else {
current = System.currentTimeMillis();
//进行订阅
RFuture<RedissonLockEntry> subscribeFuture = this.subscribe(threadId);
//申请锁的线程在此阻塞(内部使用的是CountDownLatch)
if (!this.await(subscribeFuture, time, TimeUnit.MILLISECONDS)) {
if (!subscribeFuture.cancel(false)) {
subscribeFuture.onComplete((res, e) -> {
if (e == null) {
//取消订阅
this.unsubscribe(subscribeFuture, threadId);
}
});
}
this.acquireFailed(threadId);
return false;
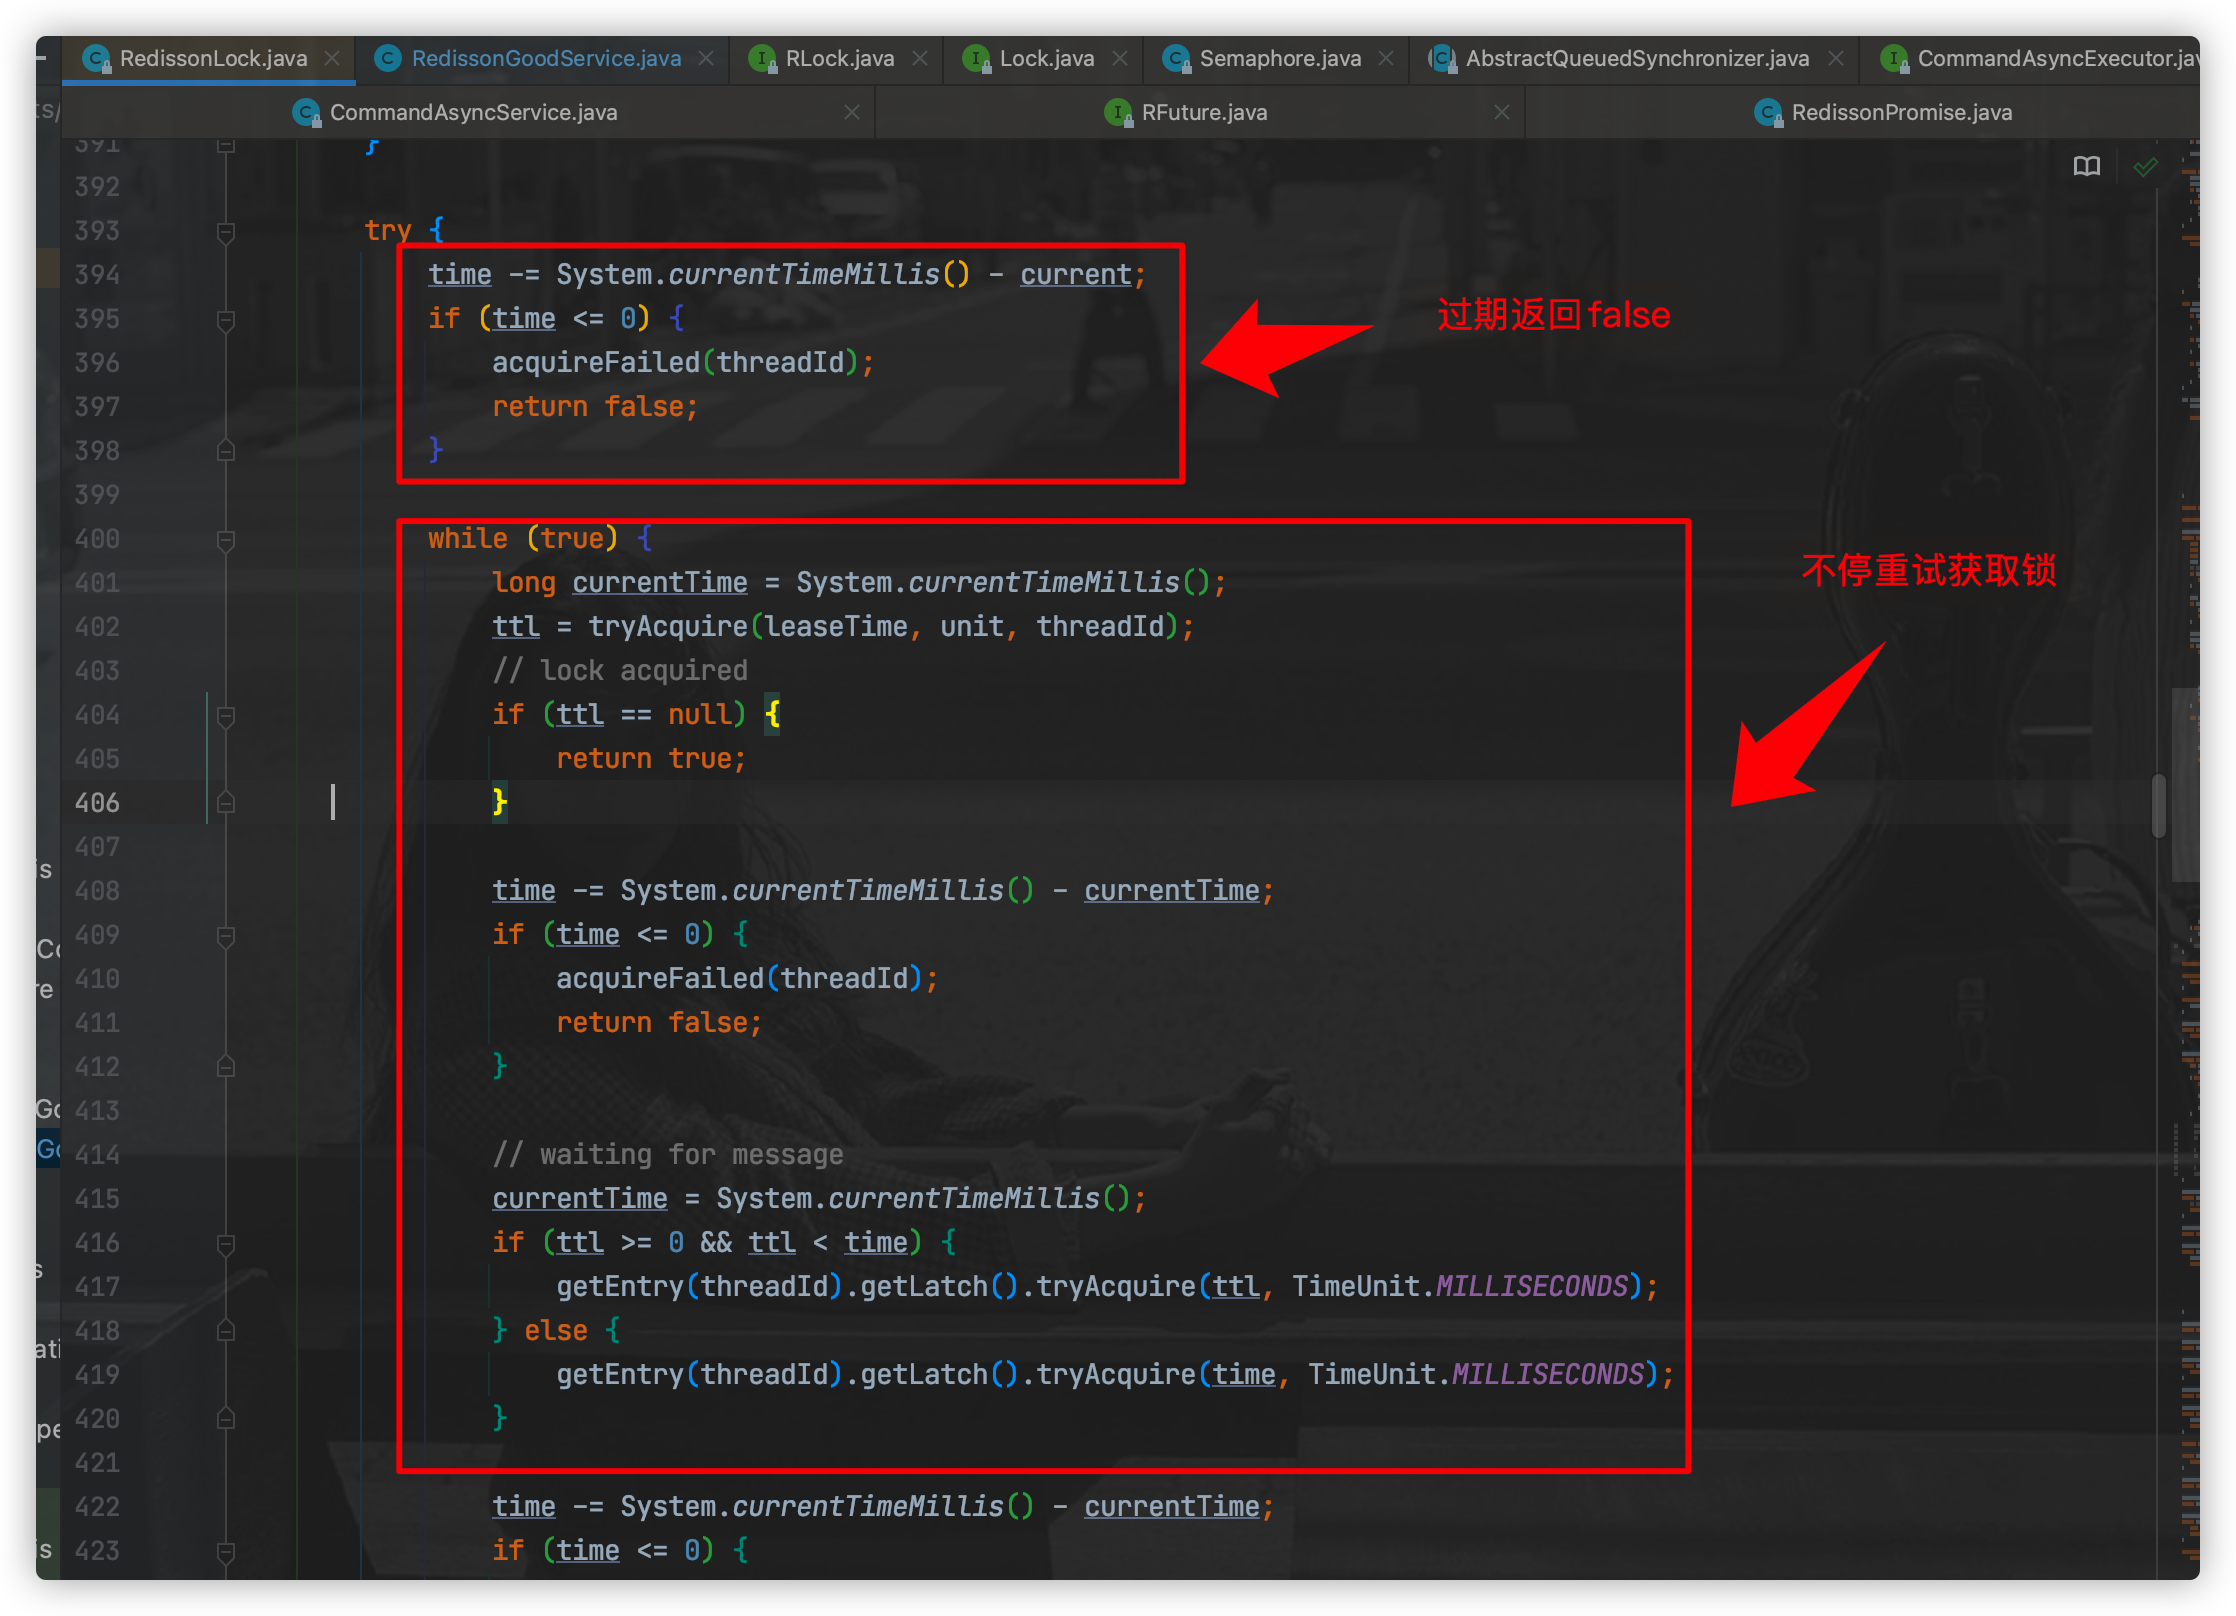
} else {
boolean var14;
try {
time -= System.currentTimeMillis() - current;
if (time > 0L) {
boolean var16;
do {
long currentTime = System.currentTimeMillis();
ttl = this.tryAcquire(leaseTime, unit, threadId);
if (ttl == null) {
var16 = true;
return var16;
}
time -= System.currentTimeMillis() - currentTime;
if (time <= 0L) {
this.acquireFailed(threadId);
var16 = false;
return var16;
}
currentTime = System.currentTimeMillis();
if (ttl >= 0L && ttl < time) {
this.getEntry(threadId).getLatch().tryAcquire(ttl, TimeUnit.MILLISECONDS);
} else {
this.getEntry(threadId).getLatch().tryAcquire(time, TimeUnit.MILLISECONDS);
}
time -= System.currentTimeMillis() - currentTime;
} while(time > 0L);
this.acquireFailed(threadId);
var16 = false;
return var16;
}
this.acquireFailed(threadId);
var14 = false;
} finally {
//取消订阅
this.unsubscribe(subscribeFuture, threadId);
}
return var14;
}
}
}
}锁续期-看门狗机制
当为分布式锁设置过期时间时,可能会出现业务未执行完,分布式锁过期的情况。解决这种问题的方式就是为锁增加过期时间,即锁续期。Redisson 内部的 Watch Dog 机制能够解决锁续期的问题。
Watch Dog 机制就是在获取分布式锁的时候,开启一个后台的定时线程。
分布式锁默认的过期时间是 30 s,而这个线程会每隔 10 s 检查一次。
从 本地 Map
EXPIRATION_RENEWAL_MAP 中获取线程 Id。执行 lua 脚本,延长 redis 中 key 的过期时间(若存在 key 就延长)。
java//-----------------延长redis中key过期时间----------------- protected RFuture<Boolean> renewExpirationAsync(long threadId) { //使用lua脚本更新指定key的过期时间 return commandExecutor.evalWriteAsync(getName(), LongCodec.INSTANCE, RedisCommands.EVAL_BOOLEAN, "if (redis.call('hexists', KEYS[1], ARGV[2]) == 1) then " + "redis.call('pexpire', KEYS[1], ARGV[1]); " + "return 1; " + "end; " + "return 0;", Collections.<Object>singletonList(getName()), internalLockLeaseTime, getLockName(threadId)); }若服务宕机,看门狗机制对应的定时线程也没有了,此时 key 会在 30 s 后过期。
注意,若指定了过期时间 leaseTime,看门狗机制不会生效。
以 RLock 中的 tryLock(long waitTime, long leaseTime, TimeUnit unit) 方法举例。
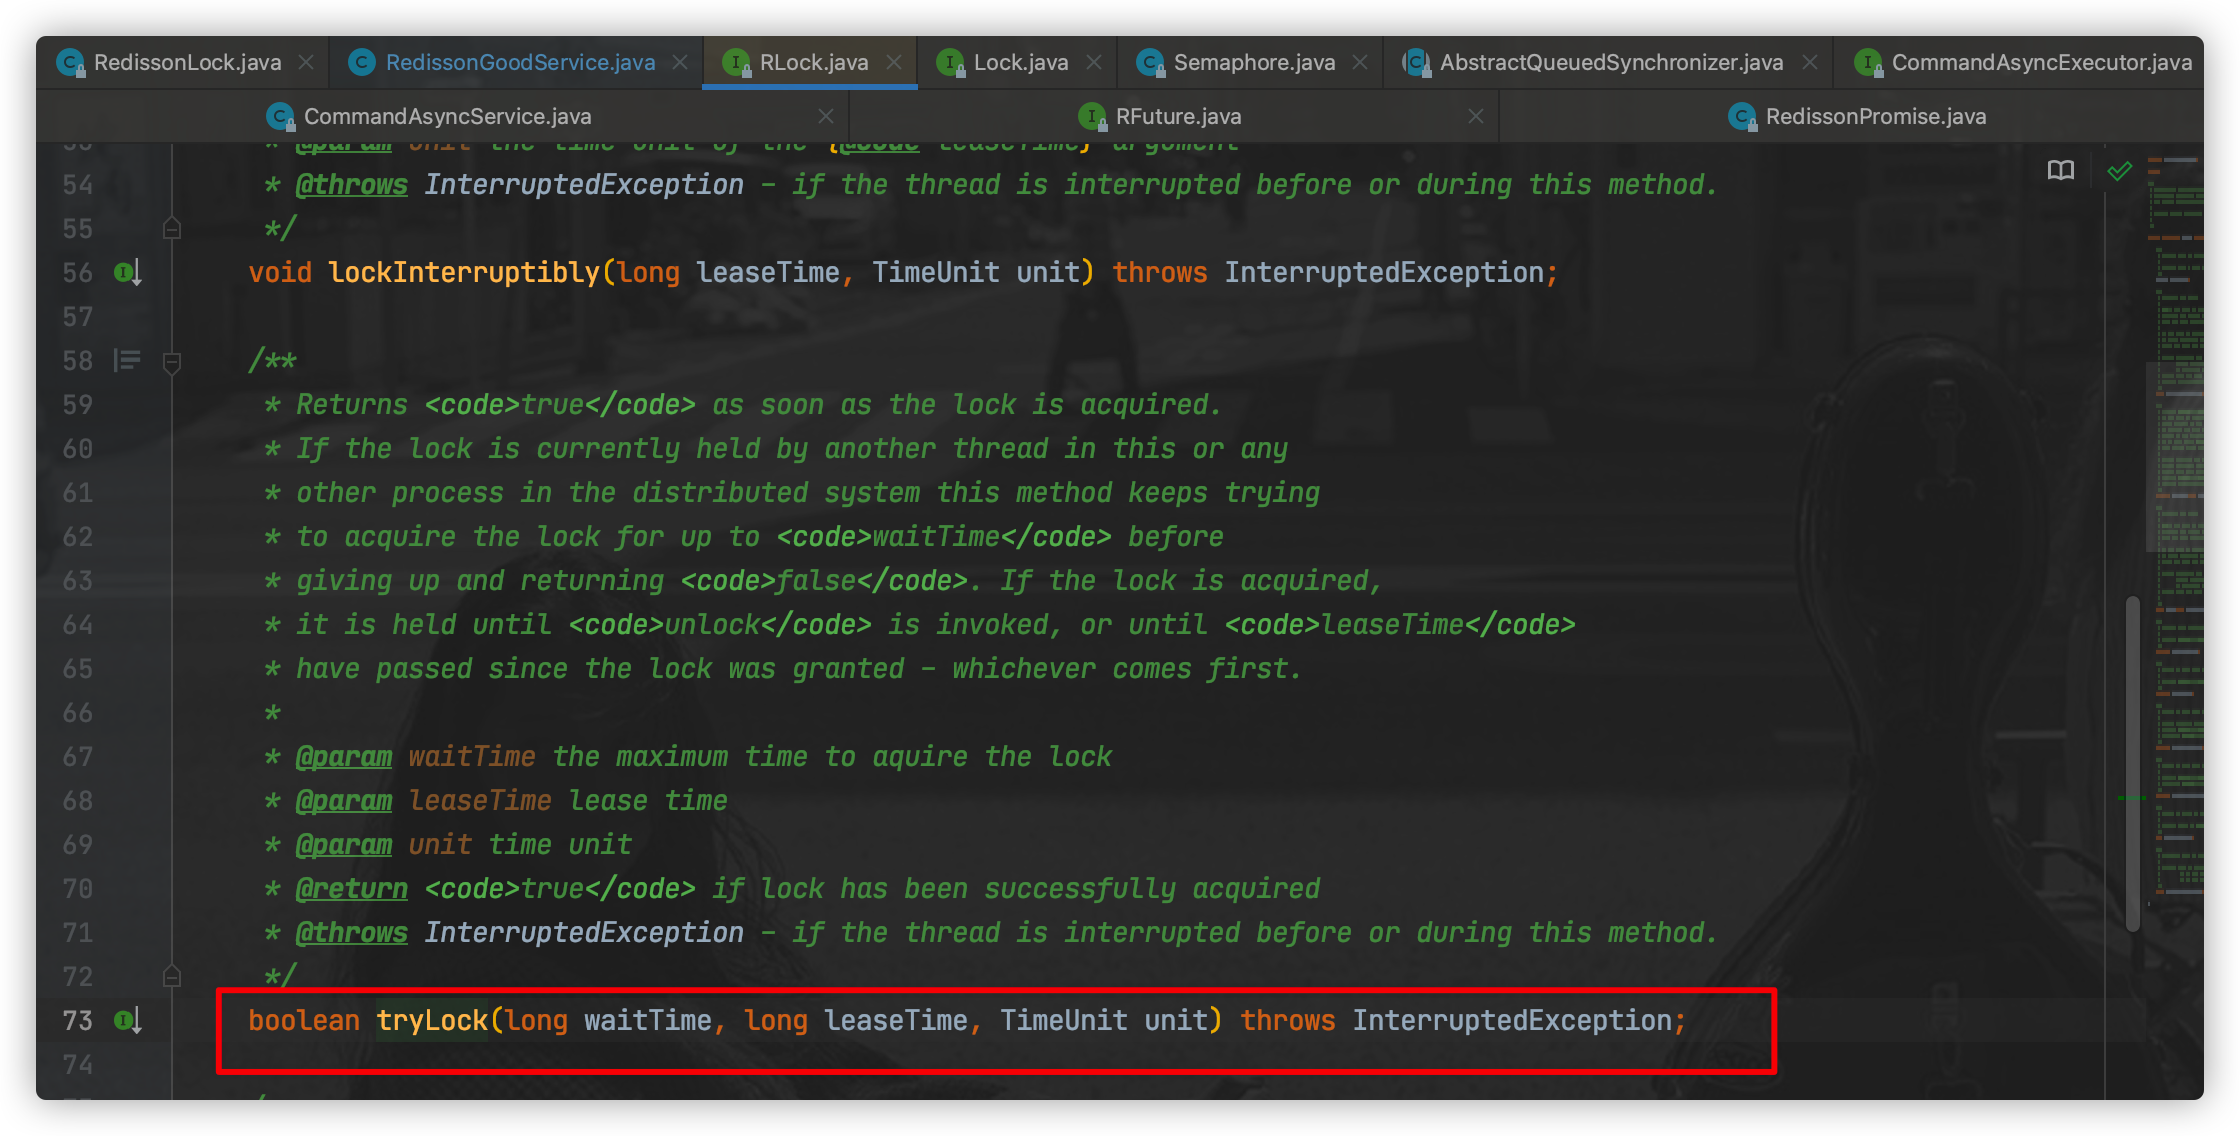
waitTime
锁申请的等待时间。
若不设置,会不停重试获取锁。若设置了指定时间,则在指定时间停止重试,返回 false。
leaseTime
锁的过期时间。
leaseTime 默认 -1,代表永不过期,会触发看门狗机制。
修改 leaseTime 为其它有效值,代表在指定时间后过期,不会触发看门狗机制。
锁删除原理
在删除锁的时候,不仅要删除 Redis 中的锁,还要通知由于申请锁阻塞的线程(Redis 的发布订阅)。若开启了 Watch Dog 机制,还要将 Watch Dog 机制关闭。
lock.unlock();源码中 unlock() 的具体实现。
    @Override
    public void unlock() {
        try {
          	//get方法是非阻塞等待(CountDownLatch)
            get(unlockAsync(Thread.currentThread().getId()));
        } catch (RedisException e) {
            if (e.getCause() instanceof IllegalMonitorStateException) {
                throw (IllegalMonitorStateException) e.getCause();
            } else {
                throw e;
            }
        }

    }

		@Override
    public RFuture<Void> unlockAsync(long threadId) {
        RPromise<Void> result = new RedissonPromise<Void>();
      	//调用解锁方法
        RFuture<Boolean> future = unlockInnerAsync(threadId);
				//解锁完成后的回调方法
        future.onComplete((opStatus, e) -> {
            if (e != null) {
              	//取消看门狗机制
                cancelExpirationRenewal(threadId);
                result.tryFailure(e);
                return;
            }

            if (opStatus == null) {
                IllegalMonitorStateException cause = new IllegalMonitorStateException("attempt to unlock lock, not locked by current thread by node id: "
                        + id + " thread-id: " + threadId);
                result.tryFailure(cause);
                return;
            }
            //取消看门狗机制
            cancelExpirationRenewal(threadId);
            result.trySuccess(null);
        });

        return result;
}真正实现解锁的方法 unlockInnerAsync,内部使用了 lua 脚本。
    protected RFuture<Boolean> unlockInnerAsync(long threadId) {
        return commandExecutor.evalWriteAsync(getName(), LongCodec.INSTANCE, RedisCommands.EVAL_BOOLEAN,
                "if (redis.call('hexists', KEYS[1], ARGV[3]) == 0) then " +
                    "return nil;" +
                "end; " +
                "local counter = redis.call('hincrby', KEYS[1], ARGV[3], -1); " +
                "if (counter > 0) then " +
                    "redis.call('pexpire', KEYS[1], ARGV[2]); " +
                    "return 0; " +
                "else " +
                    "redis.call('del', KEYS[1]); " +
                    "redis.call('publish', KEYS[2], ARGV[1]); " +
                    "return 1; "+
                "end; " +
                "return nil;",
                Arrays.<Object>asList(getName(), getChannelName()), LockPubSub.UNLOCK_MESSAGE, internalLockLeaseTime, getLockName(threadId));

}对删除锁的 lua 脚本分析如下。
//判断key是否存在
"if (redis.call('hexists', KEYS[1], ARGV[3]) == 0) then " +
		"return nil;" +
"end; " +
//对key的value值减1,即计数统计减1
"local counter = redis.call('hincrby', KEYS[1], ARGV[3], -1); " +
"if (counter > 0) then " +
		"redis.call('pexpire', KEYS[1], ARGV[2]); " +
		"return 0; " +
"else " +
  	//先删除key
		"redis.call('del', KEYS[1]); " +
  	//发布消息,通知申请锁的线程
		"redis.call('publish', KEYS[2], ARGV[1]); " +
		"return 1; "+
"end; " +
"return nil;",主从存在的问题
Redisson无法解决 Redis 在主从复制、哨兵集群下的多节点问题:
- 客户端 A 将 Key 写入到 Master 节点成功获取到锁;
- 此时 Master 节点发生故障,Key 没有来得及同步到 Slave 上(数据是后台通过异步同步的);
- Slave 节点升级为 Master 节点;
- 客户端 B 从新的 Master 节点获取到了对应同一个资源的锁。
引入了 RedLock 来解决主从复制分布式锁的问题。
加锁原理源码解读
使用普通的可重入锁,以及默认的加锁方法来分析 Redisson内部的加锁原理和看门狗机制。
A. 默认加锁流程
加锁代码
java//1. 普通的可重入锁 RLock lock = redissonClient.getLock("generalLock"); // 拿锁失败时会不停的重试 // 具有Watch Dog 自动延期机制 默认续30s 每隔30/3=10 秒续到30s lock.lock();getLock()java@Override public RLock getLock(String name) { return new RedissonLock(connectionManager.getCommandExecutor(), name); }RedissonLock构造方法javapublic RedissonLock(CommandAsyncExecutor commandExecutor, String name) { super(commandExecutor, name); this.commandExecutor = commandExecutor; //UUID this.id = commandExecutor.getConnectionManager().getId(); // 默认30s =》 private long lockWatchdogTimeout = 30 * 1000; this.internalLockLeaseTime = commandExecutor.getConnectionManager().getCfg().getLockWatchdogTimeout(); this.entryName = id + ":" + name; this.pubSub = commandExecutor.getConnectionManager().getSubscribeService().getLockPubSub(); }RedissonLock里的lock()方法java@Override public void lock() { try { lock(-1, null, false); } catch (InterruptedException e) { throw new IllegalStateException(); } }RedissonLock里重写的lock()方法(重要)javaprivate void lock(long leaseTime, TimeUnit unit, boolean interruptibly) throws InterruptedException { long threadId = Thread.currentThread().getId(); //-------------B.开始加锁(重要方法)------------- Long ttl = tryAcquire(leaseTime, unit, threadId); //获取锁,直接返回 // lock acquired if (ttl == null) { return; } //-----------D.锁申请机制(没获取到锁,申请锁)---------- //使用redis的发布订阅 RFuture<RedissonLockEntry> future = subscribe(threadId); commandExecutor.syncSubscription(future); try { while (true) { ttl = tryAcquire(leaseTime, unit, threadId); // lock acquired if (ttl == null) { break; } // waiting for message if (ttl >= 0) { try { getEntry(threadId).getLatch().tryAcquire(ttl, TimeUnit.MILLISECONDS); } catch (InterruptedException e) { if (interruptibly) { throw e; } getEntry(threadId).getLatch().tryAcquire(ttl, TimeUnit.MILLISECONDS); } } else { if (interruptibly) { getEntry(threadId).getLatch().acquire(); } else { getEntry(threadId).getLatch().acquireUninterruptibly(); } } } } finally { unsubscribe(future, threadId); } // get(lockAsync(leaseTime, unit)); }
B. 开始加锁源码解读
开始加锁 -
tryAcquire方法javaprivate Long tryAcquire(long leaseTime, TimeUnit unit, long threadId) { return get(tryAcquireAsync(leaseTime, unit, threadId)); }tryAcquire方法中的get()方法java//从RFuture中获取返回结果 protected final <V> V get(RFuture<V> future) { return commandExecutor.get(future); }加锁重要逻辑 -
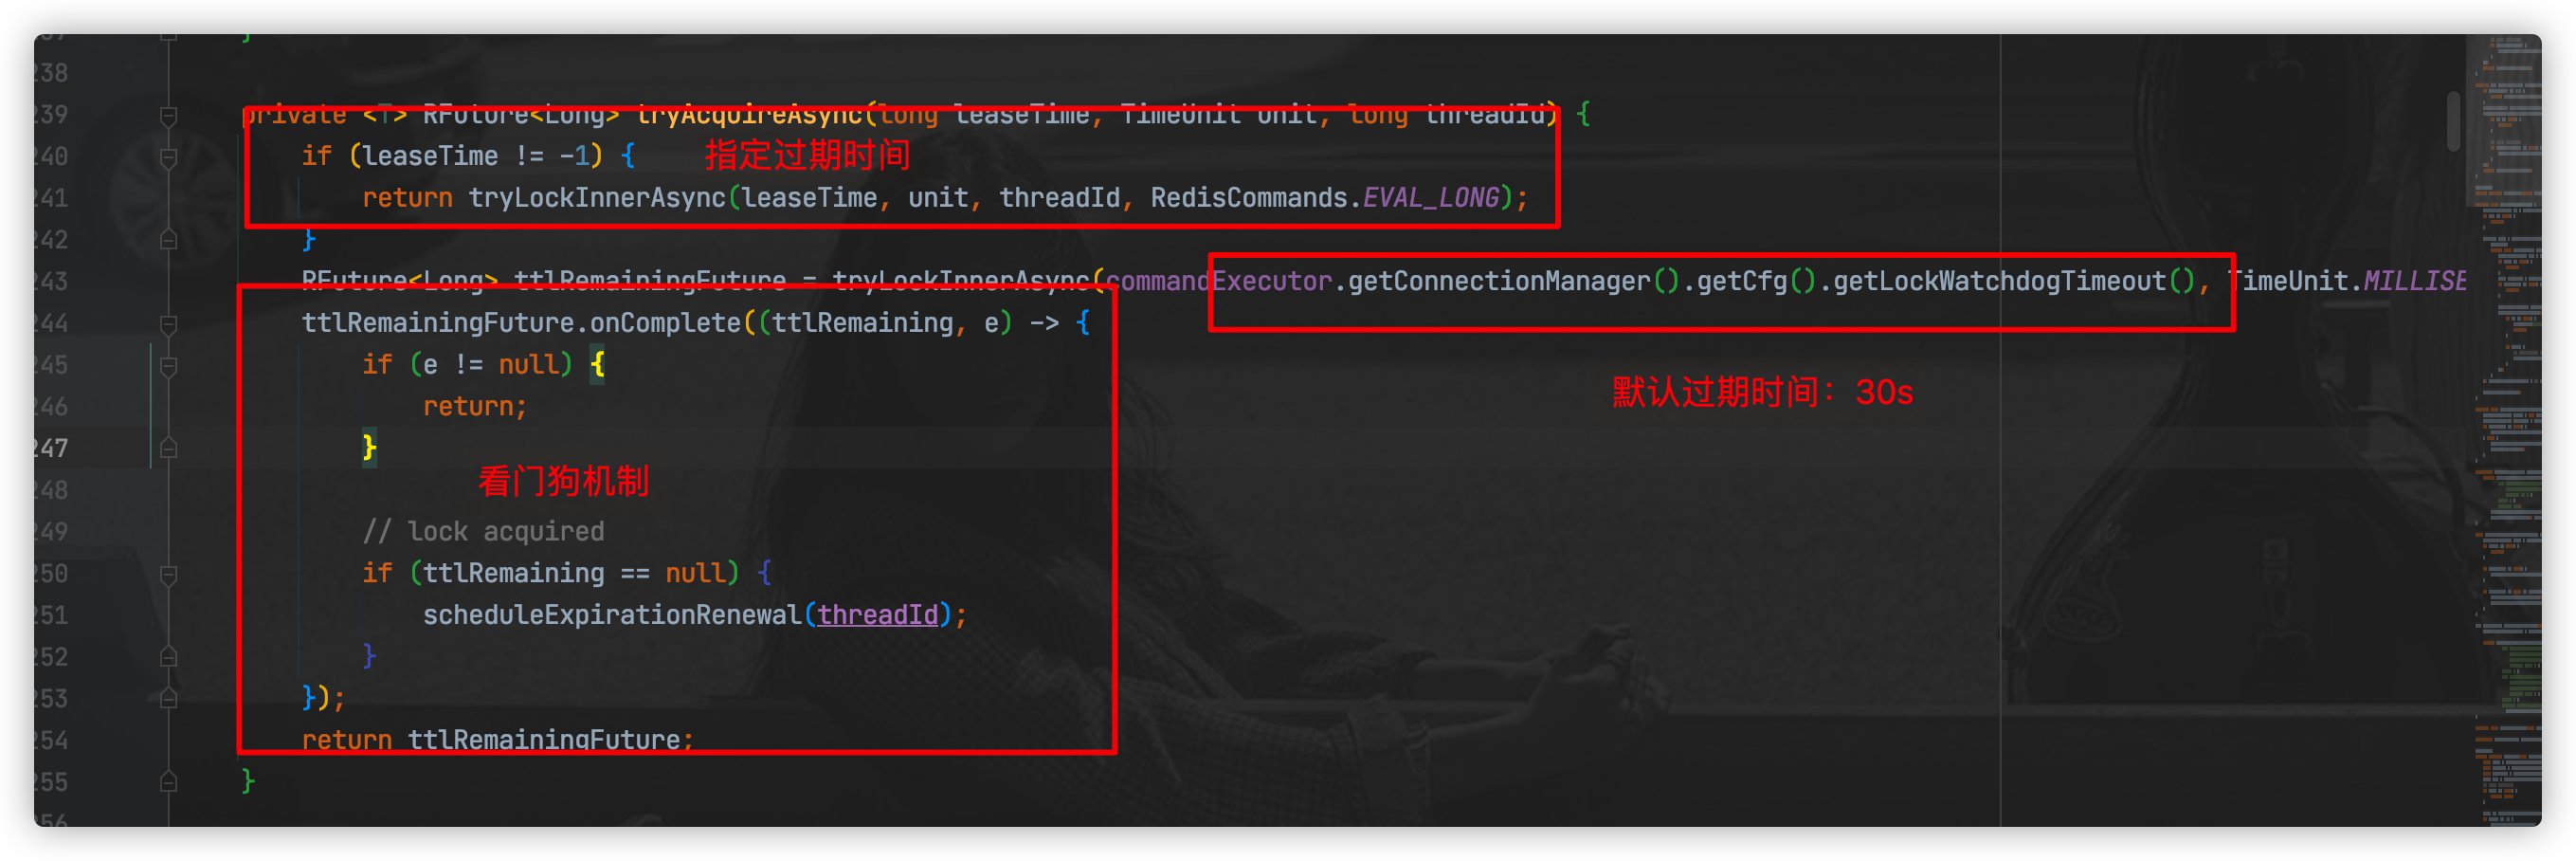
tryAcquireAsyncjava//--------------加锁重要逻辑--------------- private <T> RFuture<Long> tryAcquireAsync(long leaseTime, TimeUnit unit, long threadId) { //1.没有 WatchDog, if (leaseTime != -1) { //直接加锁(没有 Watch Dog) //可以设置锁的过期时间 return tryLockInnerAsync(leaseTime, unit, threadId, RedisCommands.EVAL_LONG); } //2.有 WatchDog //getLockWatchdogTimeout => lockWatchdogTimeout = 30 * 1000;默认的过期时间是 。 RFuture<Long> ttlRemainingFuture = tryLockInnerAsync(commandExecutor.getConnectionManager().getCfg().getLockWatchdogTimeout(), TimeUnit.MILLISECONDS, threadId, RedisCommands.EVAL_LONG); //加锁完成后的回调方法 ttlRemainingFuture.onComplete((ttlRemaining, e) -> { if (e != null) { return; } // lock acquired if (ttlRemaining == null) { //C.获取锁,调用看门狗机制 scheduleExpirationRenewal(threadId); } }); return ttlRemainingFuture; }真正加锁的地方 -
tryLockInnerAsyncjava//----------------------真正加锁的地方---------------------- <T> RFuture<T> tryLockInnerAsync(long leaseTime, TimeUnit unit, long threadId, RedisStrictCommand<T> command) { //获取过期时间 internalLockLeaseTime = unit.toMillis(leaseTime); //使用 lua 脚本加锁 return commandExecutor.evalWriteAsync(getName(), LongCodec.INSTANCE, command, "if (redis.call('exists', KEYS[1]) == 0) then " + "redis.call('hset', KEYS[1], ARGV[2], 1); " + "redis.call('pexpire', KEYS[1], ARGV[1]); " + "return nil; " + "end; " + "if (redis.call('hexists', KEYS[1], ARGV[2]) == 1) then " + "redis.call('hincrby', KEYS[1], ARGV[2], 1); " + "redis.call('pexpire', KEYS[1], ARGV[1]); " + "return nil; " + "end; " + "return redis.call('pttl', KEYS[1]);", Collections.<Object>singletonList(getName()), internalLockLeaseTime, getLockName(threadId)); }
C. 看门狗机制源码解读
开启看门狗模式 -
scheduleExpirationRenewaljava//开启看门狗模式 private void scheduleExpirationRenewal(long threadId) { ExpirationEntry entry = new ExpirationEntry(); //本地缓存线程Id ExpirationEntry oldEntry = EXPIRATION_RENEWAL_MAP.putIfAbsent(getEntryName(), entry); if (oldEntry != null) { oldEntry.addThreadId(threadId); } else { //首次创建 entry.addThreadId(threadId); //--------看门狗实现---更新过期时间---------- renewExpiration(); } }看门狗主要实现方法 -
renewExpirationjavaprivate void renewExpiration() { //判断缓存ThreadId是否为空 ExpirationEntry ee = EXPIRATION_RENEWAL_MAP.get(getEntryName()); if (ee == null) { return; } //开启一个延时调度的线程 Timeout task = commandExecutor.getConnectionManager().newTimeout(new TimerTask() { @Override public void run(Timeout timeout) throws Exception { //判断缓存ThreadId是否为空 ExpirationEntry ent = EXPIRATION_RENEWAL_MAP.get(getEntryName()); if (ent == null) { return; } //获取ThreadId Long threadId = ent.getFirstThreadId(); if (threadId == null) { return; } //------------------延长redis中key过期时间--------------------- RFuture<Boolean> future = renewExpirationAsync(threadId); //执行完成之后 future.onComplete((res, e) -> { if (e != null) { log.error("Can't update lock " + getName() + " expiration", e); return; } //锁延期成功之后,递归调用本方法 if (res) { // reschedule itself renewExpiration(); } }); } //internalLockLeaseTime => private long lockWatchdogTimeout = 30 * 1000; //默认过期时间是 30*1000 //这里指的是10s后执行线程内的任务 }, internalLockLeaseTime / 3, TimeUnit.MILLISECONDS); ee.setTimeout(task); }延长redis中 key 的过期时间 -
renewExpirationAsyncjava//-----------------延长redis中key过期时间----------------- protected RFuture<Boolean> renewExpirationAsync(long threadId) { //使用lua脚本更新指定key的过期时间 return commandExecutor.evalWriteAsync(getName(), LongCodec.INSTANCE, RedisCommands.EVAL_BOOLEAN, "if (redis.call('hexists', KEYS[1], ARGV[2]) == 1) then " + "redis.call('pexpire', KEYS[1], ARGV[1]); " + "return 1; " + "end; " + "return 0;", Collections.<Object>singletonList(getName()), internalLockLeaseTime, getLockName(threadId)); }
D. 锁申请机制
在默认加锁时,若没有获取到锁,进入到锁申请的阶段。
RedissonLock里重写的lock()方法(重要)javaprivate void lock(long leaseTime, TimeUnit unit, boolean interruptibly) throws InterruptedException { long threadId = Thread.currentThread().getId(); //-------------B.开始加锁(重要方法)------------- Long ttl = tryAcquire(leaseTime, unit, threadId); //获取锁,直接返回 // lock acquired if (ttl == null) { return; } //-----------D.锁申请机制(没获取到锁,申请锁)---------- //使用redis的订阅 RFuture<RedissonLockEntry> future = subscribe(threadId); //阻塞等待发布=>通知锁资源被释放 commandExecutor.syncSubscription(future); try { while (true) { //尝试获取锁 ttl = tryAcquire(leaseTime, unit, threadId); // lock acquired if (ttl == null) { break; } // waiting for message //阻塞,时间为锁剩余的过期时间 if (ttl >= 0) { try { getEntry(threadId).getLatch().tryAcquire(ttl, TimeUnit.MILLISECONDS); } catch (InterruptedException e) { if (interruptibly) { throw e; } getEntry(threadId).getLatch().tryAcquire(ttl, TimeUnit.MILLISECONDS); } } else { if (interruptibly) { getEntry(threadId).getLatch().acquire(); } else { getEntry(threadId).getLatch().acquireUninterruptibly(); } } } } finally { //取消订阅 unsubscribe(future, threadId); } // get(lockAsync(leaseTime, unit)); }
红锁
简介
在分布式版本的算法里我们假设我们有N个Redis master节点,这些节点都是完全独立的,我们不用任何复制或者其他隐含的分布式协调算法。我们已经描述了如何在单节点环境下安全地获取和释放锁。因此我们理所当然地应当用这个方法在每个单节点里来获取和释放锁。在我们的例子里面我们把N设成5,这个数字是一个相对比较合理的数值,因此我们需要在不同的计算机或者虚拟机上运行5个master节点来保证他们大多数情况下都不会同时宕机。一个客户端需要做如下操作来获取锁:
1、获取当前时间(单位是毫秒)。
2、轮流用相同的key和随机值在N个节点上请求锁,在这一步里,客户端在每个master上请求锁时,会有一个和总的锁释放时间相比小的多的超时时间。比如如果锁自动释放时间是10秒钟,那每个节点锁请求的超时时间可能是5-50毫秒的范围,这个可以防止一个客户端在某个宕掉的master节点上阻塞过长时间,如果一个master节点不可用了,我们应该尽快尝试下一个master节点。
3、客户端计算第二步中获取锁所花的时间,只有当客户端在大多数master节点上成功获取了锁(在这里是3个),而且总共消耗的时间不超过锁释放时间,这个锁就认为是获取成功了。
4、如果锁获取成功了,那现在锁自动释放时间就是最初的锁释放时间减去之前获取锁所消耗的时间。
5、如果锁获取失败了,不管是因为获取成功的锁不超过一半(N/2+1)还是因为总消耗时间超过了锁释放时间,客户端都会到每个master节点上释放锁,即便是那些他认为没有获取成功的锁。
使用方法
Redisson 中封装的有 RedLock,可以直接使用。
        RLock redLock = redissonClient.getRedLock(lock,fairLock);
        redLock.lock();
        redLock.unlock();